Viser opslag med etiketten review. Vis alle opslag

24.02.2013

[Review] Geo Bella Brown (on light eyes)


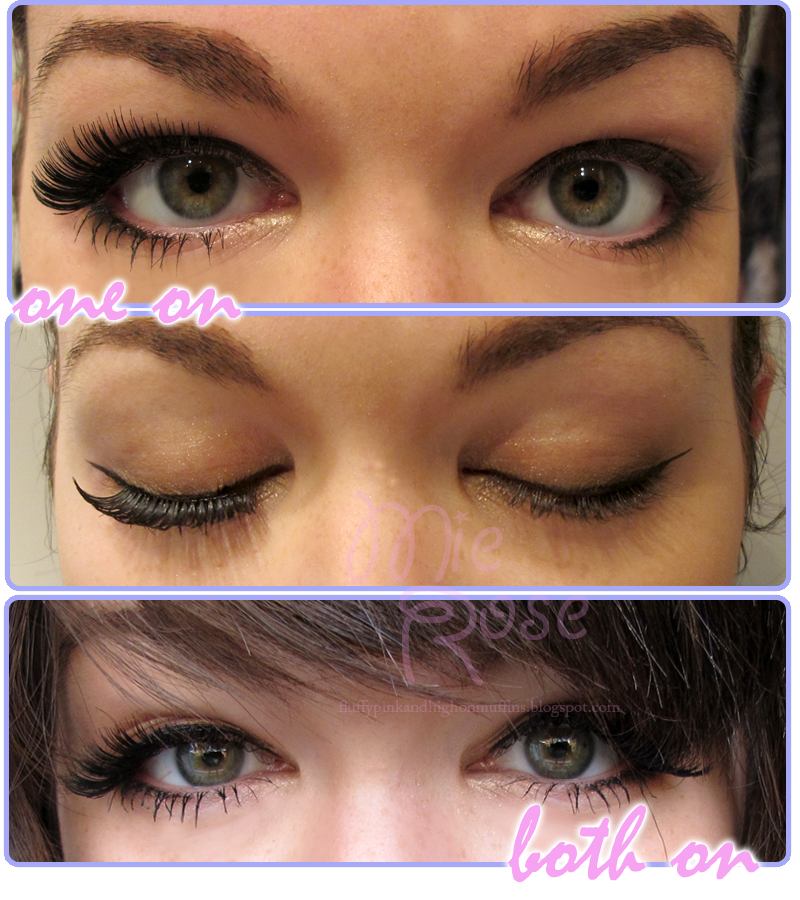
My review of the Geo Bella Brown on light eyes!


Ordered from PinkyParadise!
*This is NOT a sponsored review, and all opinions stated are my own.*


Comfort: 10/10
No problems with tunnel vision, and they do not really dry out my eyes either. A slight discomfort just as you put them in, but that is to be expected from all contacts you put in your eyes.

Design: 10/10
They blend SO incredibly well with my natural green eyes, and they also look so natural when worn. Normally I get a lot of comments when I wear lenses, but wearing these, only another person who uses circle lenses asked if I was wearing any!

Enlargement: 10/10
For being a 14.2/14.2 mm lens, they enlarge quite a lot I would say! I get almost the same effect from these as I get from my larger Vassen Jewel Blue lenses, so that is quite impressive!

Over all: 10/10
These lenses are everything I could want from my circle lenses, and I am still in awe of how well they blend with my natural eye!

Service:
As always I had no problems with ordering and receiving my items. I got them around a week after they were shipped  out, and this is in spite of the Lunar Holiday rush! So I am as always really pleased with the service I got at PinkyParadise!

!!Remember to take good care of your eyes, you only get one pair and they have to last all life. Practice good lens hygiene and consult an eye specialist if you experience any discomfort!!


- and now for some selca spam so you can see more of the babies in action!


And a little outfit shot to end the madness!
Hope this was useful for you!

28.11.2012

REVIEW: Palty Raspberry Macaroon Hair Colour

Back with another review for you guys, this time of another red hair dye!
- probably going to be one of the last Japanese hair dye reviews though, because the bleach in them makes my hair lighter and lighter every time, and I really do not want to end up with really light hair :/

oh well, on with it!

Tsubasa looking flawless as ever! I wanted to try a non foam dye this time, just to see if the colour lasted longer!


Colour chart. I really do not get the names they come up with for the hair dyes though lol.

Contents! The gloves are the 'classic' hair dye gloves, so they are not as nice as the one you got with the Beautylaboo :C But the after treatment is really nice though!
If you have longish hair and really much of it like me, you should get two packets! - also remember to straighten your hair before hand. Why, oh I shall show you.


You see that nozzle? It kinda works like a comb, but a really bad one, so it will be really hard to apply it in curly hair. So take my advise, straighten your hair before using this colour!


 And the results! I left it in for around 40 minutes because I lost track of time. It is more red than before when it faded, and the colour last a little longer before it starts to fade. Though it looks really red here, in real life it is a lot more brown :/
- and sorry for no face pictures. My life have been really busy so I pretty much just get back from uni and die in my bed :C
-- also sorry for how blurry the after is, but you still get a sense of the colour difference.

COMPARED to the Beautylabo Whip Hair Colour:
Applying it is MUCH harder than with the Whip Colour, and you need more time to make sure it is even. I spend around 60 minutes colouring and making sure it was all even with the Palty dye vs the 45 minutes I used with Beautylabo. But the Palty colour takes longer to fade though!
Although it is not as red as I could have wished for, I am still quite happy with the result.

17.10.2012

REVIEW: Beautylabo "Furifuri" Whip Hair Colour; Candy Pink


For AGES I have been wanting to dye my hair, and now I finally got around to do so! I really wanted to try red this time around. I did for a very short period two years ago try to have a purple ish red, but at the time I really wanted a light brown, and just took the wrong bottle of hair dye when I was in a hurry. I felt I just looked WAY too much like my mother (who dyes her hair red), but this time I really wanted to try a red on me, looking like my mother or not. I wanted to go a lighter colour and I really did not feel like having brown hair, when I am in the land that makes hair dye geared to dark hair, thus I tried red. (Because blonde would look horribad on me)


Despite it being named candy pink, none of the colours really look THAT candy pink :X - which is good because I am so not getting pink hair all over.


Content shot! And can I just dote a little over how cute and girly it all is? And how amazing quality the gloves are! Having fitting gloves while you dye your own hair is amazing!!
- and yes, I got two bottles because I have so thick hair. I did have a lot left, but then again, it is nicer to have too much than too little.


When it is all fluffed up! It starts out as this really light brownish colour, then changes to really pink, then purple and finally a beautiful crimson red. 

 Hair before dyeing.


While waiting for the dye to settle.
And here, while you can dote on my beautiful face, I will talk a little about THE APPLICATION PROCESS.
It was really easy, and if you paid just the slightest attention (which I ofc did not) I am quite sure you can use this dye on your self without making a mess. The foam is not a bit runny and after you have foamed up your hair, you can make sure every strand is covered by dye, just by ruffling everything around like a normal shampoo. And after 30 minutes you rinse (two times shampoo, one time conditioner according to the instructions), and then done! - and you can apply the after colour treatment after your shower too, it is a leave in deal.


How it looks with my curls out and all! (the one on the right is straight after it dried).


Close up comparison! As you can see, the colour is not ZOMG RED, but more like a brownish red, because my hair started out that dark. But I am quite pleased with the colour because I did not want to go really light red, sticking to the darker colours yes.

And now commence the random selca to show off the colour on straight hair.


20.06.2012

REVIEW: Eyemazing No. 002


First impressions:
Seeing as I -really- wanted a pair of lashes in this style, I got really excited when I got these (forever ago).
The box was nice, nothing out of the ordinary, and the lashes looked fine. A bit on the really thick side IRL but I was too pumped to notice that at first.


- And a little side note here: When I opened the box I discovered that the pair had each own little holder. Quite a nifty little detail, seeing as the tray style lash boxes require you to go get a lash case unless you want to carry around 4 extra pairs with all of your makeup.

As usual click for a larger image

Style:
They are a little too thick for my taste when applied. I do not like how the transition from my lid to my lash (the inner corner) is SO harsh. Funny enough it is not that visible in my pictures, but boy if they are not placed right, they are a pain to look at irl. They open the eye a fair bit, and if you want a really dramatic look, these lashes will probably be really good. BUT! They are also quite heavy on the eye because they are so thick.

Application:
This part is why the review was so delayed! (That and cosplay+finals, seesh) They are compared to clear band lashes (which I prefer to use) really hard to apply. They are stiff and you have to fiddle around with them quite a bit to make them bend enough. They also have a really bad tendency to 'flip out' in the edges, so I would recommend you pay attention to the outer edges when applying glue - and also use a good glue, otherwise they will fly right off.

Over all:
They are really pretty, if you know how to use them. It is not something that looks good right out of the box like the Diamond Fairy eye did, but after they have been bent and used a couple of times they look better and fit a lot easier to the eye. I would not recommend them for people new to the whole lash thing, but if you a experienced user and want a dramatic look, I am sure you will like these.  

29.02.2012

Diamond Lash Fairy Eye review!

This time for real! I do not know weather or not you got a notice about this entry before, but blogger kinda pulled a fast one on me :C


The not so long awaited review!
So let's just get on with it.


First impressions:
They looked VERY square and thick to me (not at all like the promo pic), and out of the two pairs I got from my father, I was the least excited about these... But I decided to give them a chance, remembering how much I loved my previous Diamond Lash Gorgeous Eye pair, and boy I am glad I did!

You can click on the image to see a bigger version (and my beautiful under eye wrinkles)

Style:
As I said earlier, they looked extremely square in the box and that got me a little worried, because it looked like they would only look like two black lines on the top of your eye. Oh and behold! They give both volume and length, and also gives you a heavy outer eye corner (which I like, I am a cat eye type of girl). The only negative thing about them is that I personally prefer a less 'thick' lash, but that might have something to do with never having owned such a style XD;

Application:
As expected of clear band lashes they where easy to apply and they are very light when you have them on. I would warmly recommend the clear band lashes from Diamond Lash to people who are not used to wearing fake lashes. Out of all the lashes I have worn through my time, Diamond Lash has always been quite easy to apply.

Over all:
I was really pleasantly surprised by these lashes! The style (on my eye at least) looks really good and they are light and easy to wear. Maybe a little too thick, but I guess that is a matter of taste and habit.
I am sure I will end up using these a lot!

The next review will be up next week, and will be about the Eyemazing no 2 lashes!

01.04.2011

Circle lenses review!

As some of you know, I have reccived three pairs of lenses and I want to give you guys a little review of them!

Me trying to open the small bottles, picture by Kami <3
 First off: I ordered all these lenses from Pinky Paradise!
I am NOT sponsored, so this is my own personal opinion, and I am not trying to sell anything here.
And sorry for the retarded faces, I wanted to smile but had to close my mouth because otherwise my eyes would get more closed.

E.O.S Candy Pink


Natural light.

Flash.

One in.
Comfort: 5/5
I wore them for around 7 hours I think, without them really irritating me. The only thing I had trouble with was putting them in because they are so BIG!

Colour and Enlargement: 5/5
That is if you do not want these lenses to dramatically CHANGE your eye colour. It makes a nice overall pink shade and it blends in really well with your eye colour, so the lenses do not look unnatural, even though they are pink!
And the enlargement is very good in my opinion, and more flattering than some of the other models I have.

Style: 5/5
I am just in love with the Candy lenses and their style, so... I guess I am a little partial here ^^;


E.O.S Candy Blue


Natural light.

Flash.
 and no one in, refer to the Candy Pink one for size comparison.

Comfort: 5/5
Tough I did not wear them nearly as long as the pink ones, they felt pretty much the same. (Wonder why?)

Colour and Enlargement: 5/5
Again, I love the discreet but still noticeable blue colour and the enlargement is also really flattering! It is not like they give off a vibrantly blue colour, they more change the overall perception of the eye colour in a natural manner in my opinion.

Style: 5/5
Candy series! (So braised here)


Natural light.

Flash. (And I look so derp here, sorry)

One in.
Comfort: 4/5
They are smaller than the Candy lenses, and the only reason why I knock one off these is that the hole for the pupil is very small, so sometimes you get tunnel vision. (First time I ever tried this with lenses btw!)

Colour and Enlargement: 4/5
They are not brown in any world, but then again I brought them for the reason of them being so yellow! The colour looks very unnatural so I think I will only use them for cosplaying purposes. The enlargement is satisfactory compared with the diameter of the lenses. (14.2 mm)

Style: 5/5
The style is okay for this type of lenses, not my favourite, but they look good in the eye, thus why they get a top score. (This sounds so wrong, but I do not know how to phrase this differently)


Service from PP:
Good as always! My tracking number did not work though, but they arrived around a week after I ordered them, safely packed and cases for all of them in matching colours.


I cannot wait to use my lenses more!
And if some of you are interested in why I ordered the lenses:
Pink: I wanted a pink pair.
Blue: Anarchy Panty cosplay.
Yellow: Rin Kagamine cosplay


~Mie Rose

24.03.2010

Palty Bitter Cappuccino review

Palty Hair Dye Bitter Cappuccino.


First impression: Cute box xD

Content:
Tube
Bottle
Plastic gloves
Some oil thingy
Nozzle for the bottle
Instructions

I found a semi good translation of the instructions here: http://s299.photobucket.com/albums/mm289/SoompiPalty/?action=view&current=palty8inqx5.jpg
But I think if you are used to Japanese products and know a little hiragana and some kanji counters for time you will have no problems using this because there where some drawings explaining how to do it.

Application:
It was surprisingly easy! You just comb the colour in, but be careful! The dye is a little on the thin side so I accedently dropped something a couple of times, but it was also the first time ever I dyed my hair.. XD
One pack was enough for my hair but if you have longer than around shoulder length hair, I would recommend buying two bottles because I had to be very economical with the dye. It did smell a lot and sting a little, but that was because there was just a hint of bleach in it I think – and I'm used to bleach so I did not take notice of it.
I waited for around 40 minutes as I read on the internet people did. I wrapped my hair up under some clear plastic and then sat by a heater.
Then I washed my hair with both shampoo and conditioner and applied the little oil thingy from the dye pack. I did not know weather or not to apply the oil thingy, so I just applied it after I washed my hair x3;;
My hair did not feel different after, like it was damaged or anything.
The colour is visible, but not as dark as I expected, but that is only my monitors fault XP

The verdict:
Really nice and easy to use product. I would recommend it for first time users like me :D

Last but not least;
The Result:


My hair is naturally curly so that is why it looks so different XD And I had to take off my make up when I washed out the dye so I covered the bags under my eyes XP

Top view, much easier to see the difference.


Some weeks after I am still able to see the difference in my hair colour and my hair still feels like it used to ^^

~Mie